Chào mừng đến với Cafedev! Trong thế giới phát triển web ngày nay, việc kết hợp các công nghệ hiện đại như Vue.js và Rails đã trở thành một xu hướng phổ biến. Vue.js, một framework JavaScript linh hoạt và mạnh mẽ, cùng với Rails, một framework phát triển web ổn định và đáng tin cậy, tạo ra một sự kết hợp mạnh mẽ để xây dựng các ứng dụng web đáng kinh ngạc. Trong đoạn mở bài này, chúng ta sẽ khám phá sức mạnh của Vue.js khi được tích hợp vào Rails, và cách chúng có thể cùng nhau tạo ra những trải nghiệm web tuyệt vời. Hãy cùng chúng tôi đi sâu vào chủ đề Vue on Rails.
Cho đến nay, cách ưa thích để sử dụng một framework JS hiện đại như Vue trong một ứng dụng rails là sử dụng Rails như một API và tạo một SAP đầy đủ bằng Vue ở bên cạnh, mặc dù đây là một cách tốt để làm việc, nhưng không luôn không có nhược điểm, một trong số đó là, bây giờ bạn cần phải lưu trữ 2 ứng dụng để chạy sản phẩm mới của mình, làm thay đổi ngành công nghiệp.
Gần đây, tôi đã phải đối mặt với vấn đề này trong khi xây dựng một sản phẩm cho một người bạn và tôi lo lắng về việc quản lý 2 dịch vụ khác nhau, và tôi đã tìm thấy một cái gì đó gọi là Inertia.js , họ khẳng định Inertia không phải là một framework mà là một loạt các bộ chuyển đổi để kết nối 2 ứng dụng của bạn với nhau, và tôi xin thề, nó hoạt động tốt cho nhu cầu của tôi. Trên mặt khác, tôi đang tìm kiếm cách biên dịch các tài nguyên được tạo bởi Vue thành cái gì đó mà ứng dụng rails có thể hiểu và tìm thấy một dự án tuyệt vời có tên là Vite Ruby , nó tích hợp với đường ống tài nguyên của bạn và cho phép bạn không phải lo lắng về Web-packer, vì vậy hôm nay tôi muốn chỉ cho bạn cách làm việc với điều này (và các công cụ tuyệt vời khác) để tạo ra một ứng dụng Vue + Ruby on Rails có thể triển khai trên một máy chủ duy nhất (như Render, Digital Ocean, vv.
Nội dung chính
1. Dự án
Đối với bài hướng dẫn này, tôi muốn tạo ra một dự án đơn giản nhưng hữu ích, một ứng dụng theo dõi chi phí này sẽ cho phép chúng ta theo dõi các chi phí của chúng tôi theo danh mục và cho chúng ta biết chúng ta đã chi bao nhiêu tiền và vào những thứ gì. Bạn có thể kiểm tra kết quả cuối cùng trên github
Tôi sẽ bỏ qua giai đoạn thiết kế và đi thẳng vào mã, tôi đang sử dụng Ruby 3.2.2, Rails 7.0.5, nodejs 16.16.1, Vue 3.3.4 và cơ sở dữ liệu của tôi là postgresql
Bắt đầu từ đầu, tạo một dự án Ruby mới. Tôi khuyên bạn nên sử dụng chế độ tối giản hoặc bỏ qua chế độ JavaScript.
rails new expense_tracker --minimal -d pg
cd expense_tracker
bundle install
Sau đó, chúng ta sẽ thêm gem đầu tiên vào Gemfile là Vite Rails, tài liệu rất tốt và họ còn đưa ra một dự án ví dụ tốt để bạn hiểu cách làm việc với nó, hãy tuân thủ các hướng dẫn tìm thấy ở đây .
Khi hoàn thành, chúng ta sẽ thử tạo nguồn tài nguyên đầu tiên của chúng ta và sau đó chúng ta sẽ bắt đầu sửa các vấn đề, hãy bắt đầu với các danh mục của chúng ta (chỉ để tránh thêm mối quan hệ trong một bản migration)
rails g scaffold Category name:string color:string --skip-template-engine --no-test-framework2. Hãy kết nối chúng lại
Nếu chúng ta đi đến localhost:3000/categories, chúng ta sẽ gặp một lỗi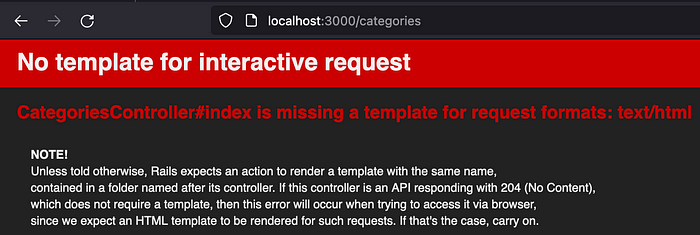
Điều này xảy ra vì chúng ta không có một view để hiển thị index của chúng ta, hãy sửa điều này bằng cách cấu hình phía front-end của chúng ta để kết nối với các trang và thành phần Vue của chúng ta. Chúng ta sẽ bắt đầu bằng cách thêm inertia vào dự án của chúng ta, cả phần back-end và phía front-end và cũng chúng ta sẽ cài đặt một framework Vue component, tôi sẽ sử dụng Vuetify . Chúng ta cũng sẽ cài đặt một số phép màu bổ sung:
* js_from_routes: một gem tạo ra các đối tượng js để truy cập các routes được tạo bởi rails vite-plugin-full-reload: một plugin giúp tải lại ứng dụng khi chúng ta thay đổi @vitejs/plugin-vue * vite-plugin-vuetify
# Gemfile
# Inertia replaces your application's view layer. The views returned by your application are JavaScript page components. [https://inertiajs.com]
gem "inertia_rails", "~> 3.0"
# Brings Rails named routes to modern javascript (https://github.com/elmassimo/js_from_routes)
gem "js_from_routes", "~> 2.0.4", group: :development

# Terminal
bundle install
npm i @inertiajs/vue3
npm i @vitejs/plugin-vue
npm i vuetify@^3.3.16
npm i vite-plugin-vuetify
npm i @js-from-routes/client
npm i @js-from-routes/inertia
Hãy bắt đầu với cài đặt của ứng dụng Vue của chúng ta:
# viteconfig.ts
import { defineConfig } from 'vite'
import RubyPlugin from 'vite-plugin-ruby'
import vue from '@vitejs/plugin-vue'
import FullReload from 'vite-plugin-full-reload'
import vuetify from 'vite-plugin-vuetify'

export default defineConfig({
  plugins: [
    RubyPlugin(),
    vue(),
    vuetify({ autoImport: true }),
    FullReload(['config/routes.rb', 'app/views/**/*'], { delay: 200 }),
  ],
})
Hãy tạo một số tệp trong app/frontend
cd app/frontend
touch app.js pages.js vuetify.js
cd ../../
Mở pages.js và thêm nội dung sau:
# pages.js
// NOTE: Optimize the SSR bundle by not splitting by page.
import Layout from "./Layouts/Main.vue"; // This line
const pages = import.meta.env.SSR
  ? import.meta.globEagerDefault("./Pages/**/*.vue", { eager: true })
  : import.meta.glob("./Pages/**/*.vue", { eager: true });

export async function resolvePage(name) {
  const page = pages[`./Pages/${name}.vue`];

  if (!page) {
    throw new Error(
      `Unknown page ${name}. Is it located under Pages with a .vue extension?`
    );
  }

  page.default.layout = page.default.layout || Layout; // This line
  return import.meta.env.SSR ? page : (await page).default;
}
Trong vuetify.js, chúng ta sẽ thêm một chủ đề sau này, nhưng hiện tại hãy giữ cho nó đơn giản
# vuetify.js
// Vuetify plugin
import 'vuetify/styles'
import '@mdi/font/css/materialdesignicons.css'
import { createVuetify } from 'vuetify'

export const vuetifyPlugin = createVuetify({
  ssr: true
})
Trong app.js, chúng ta sẽ thiết lập mọi thứ thiếu, trong trường hợp bạn muốn biết về thanh tiến trình, hãy đi đến a href=”https://inertiajs.com/progress-indicators”https://inertiajs.com/progress-indicators
# app.js
import { createApp, h } from "vue";
import { createInertiaApp, Head, Link } from "@inertiajs/vue3";
import { vuetifyPlugin } from "./vuetify";
import { resolvePage } from "./pages";

export default function () {
  createInertiaApp({
    resolve: resolvePage,
    progress: {
      // The delay after which the progress bar will appear, in milliseconds...
      delay: 50,

      // Whether to include the default NProgress styles...
      includeCSS: true,

      // Whether the NProgress spinner will be shown...
      showSpinner: false,
    },
    setup({ el, App, props, plugin }) {
      const app = createApp({ render: () => h(App, props) });
      app.use(plugin);
      app.use(vuetifyPlugin);

      app.component("iHead", Head);
      app.component("iLink", Link);

      app.mount(el);
    },
  });
}
Sau đó trong application.js của chúng ta, thêm đoạn mã sau vào cuối tệp
# application.js
# ...
import createApp from "~/app";
createApp();
Cuối cùng, chúng ta sẽ tạo một thư mục Pages mới trong app/frontend, và một thư mục được gọi là categories (đây sẽ chứa tất cả các trang danh mục) và bên trong là một tệp index.vue, đây là cấu trúc:
>app
  > frontend
    > Pages
      > categories
        > index.vue
Ở đây, chúng ta sẽ tạo chỉ một cái gì đó đơn giản để xem rằng mọi thứ đang hoạt động.
<template>
  {{ categories }}
</template>

<script setup>
defineProps(["categories"]);
</script>
Cuối cùng, đi đến categories_controller#index của bạn
# categories_controller
def index
    @categories = Category.all
    render inertia: "categories/index", props: {
      categories: @categories
    }
  end
Hãy tạo một vài danh mục trong console của chúng ta:
Category.create([
    {name: "Leasing", color: "#F06292"},
    {name: "Credit Card", color: "#5C6BC0"},
    {name: "Subscription", color: "#9CCC65"},
])
Và đi đến a href=”http://localhost:3000/categories”http://localhost:3000/categories để xem các danh mục mới của bạn dưới dạng văn bản:
Cuối cùng hãy tạo một trang index rõ ràng hơn, đi đến app/frontend/Pages/categories/index.vue
# index.vue
<template>
  <v-container>
    <div v-for="category in categories" :key="category.id" class="pa-4">
      <v-card :text="category.name" :color="category.color"/>
    </div>
  </v-container>
</template>

<script setup>
defineProps(["categories"]);
</script>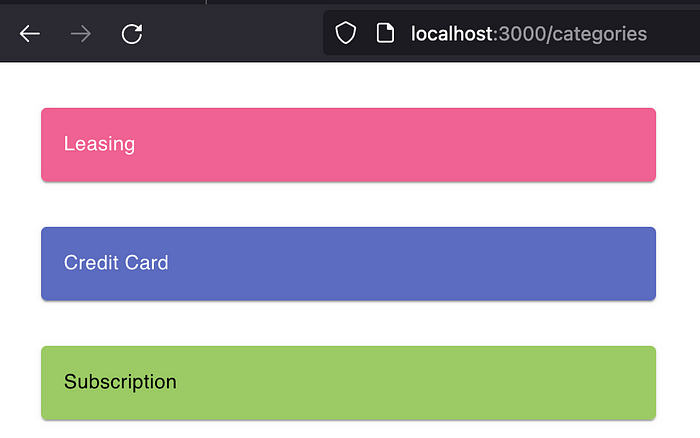
3. Hãy tăng âm lượng lên
Okay, điều này tốt, nhưng chúng ta muốn tạo một nguồn tài nguyên khác cho ứng dụng của chúng ta, nguồn chính, các Chi phí, chúng ta sẽ sao chép nhiều thứ mà chúng ta đã thấy trước đó:
rails g scaffold Expense name:string amount:decimal category:references --skip-template-engine --no-test-frameworkHãy tạo một chế độ xem vue nhanh chóng (nhớ tạo một thư mục chi phí mới dưới frontend/Pages)
<template>
  <div v-for="expense in expenses" :key="expense.id" class="pa-4">
    <v-card variant="tonal">
      <template v-slot:title>
        {{ expense.name }}
      </template>

      <template v-slot:subtitle>
       {{ expense.amount }}
      </template>
    </v-card>
  </div>
</template>

<script setup>
defineProps(["expenses"]);
</script>
Và trong expenses_controller của chúng ta thêm
def index
  @expenses = Expense.all
  render inertia: "expenses/index", props: {
    expenses: @expenses
  }
end
Chạy các migrations và trong console của rails thêm một số chi phí:
Expense.create([
    {name: "Car", category_id: 1, amount: 1200},
    {name: "TV", category_id: 2, amount: 400},
    {name: "Music", category_id: 3, amount: 12},
])
Bạn có thể nhận thấy rằng chúng ta cần điều hướng đến nguồn tài nguyên mong muốn từ thanh URL 😿, chúng ta muốn thêm một bố cục mặc định để mọi trang (trừ những trang nói ngược lại) sử dụng nó để hiển thị nội dung.
Trong routes.rb của chúng ta, chúng ta cần thay đổi một số dòng (đảm bảo rằng bạn đã cài đặt gem “js_from_routes”)
# routes.rb
Rails.application.routes.draw do
  defaults export: true do
    resources :expenses
    resources :categories
  end
end
Trong terminal chạy rake js_from_routes:generate, điều này sẽ tạo ra một thư mục api mới dưới frontend, điều này sẽ giúp chúng ta tạo ra các liên kết
Hãy tạo một thư mục mới dưới frontend gọi là Layouts và bên trong đó là một tệp default.vue
# default.vue
<template>
  <v-app id="inspire">
    <v-navigation-drawer v-model="drawer">
      <v-list>
        <iLink v-for="resource in resources" :key="resource.name" :href="resource.uri" role="navigation"
          class="inertia-link">
          <v-list-item :value="resource.name" color="primary" link>
            <template v-slot:prepend>
              <v-icon :icon="resource.icon" />
            </template>
            <v-list-item-title>{{ resource.name }}</v-list-item-title>
          </v-list-item>
        </iLink>
      </v-list>
    </v-navigation-drawer>

    <v-app-bar color="primary">
      <v-app-bar-nav-icon @click="drawer = !drawer"></v-app-bar-nav-icon>

      <v-app-bar-title>Application</v-app-bar-title>
    </v-app-bar>

    <v-main>
      <v-container>
        <slot />
      </v-container>
    </v-main>
  </v-app>
</template>

<script setup>
import { ref } from 'vue'

const drawer = ref(null)
const resources = [
  { name: "Expenses", uri: "/expenses", icon: "mdi-finance" },
  { name: "Categories", uri: "/categories", icon: "mdi-rhombus-split" },
]
</script>

<style lang="scss" scoped>
.inertia-link {
  color: #212121;
  text-decoration-line: none;
}
</style>
Tôi đang sử dụng sass ở đây nhưng bạn có thể sử dụng css bình thường cho kiểu dáng, thành phần cho phép chúng ta chèn trang vào trong mẫu, kết quả là như sau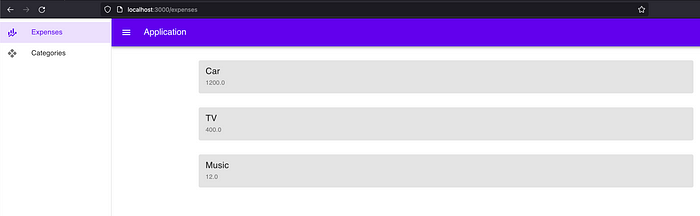
4. Trang lỗi
Nếu bạn cố gắng truy cập vào một route không tồn tại, bạn sẽ nhận được trang lỗi thông thường của rails, chúng tôi muốn thay đổi điều này bằng cách tạo ra một exceptions_app, bạn có thể đọc bài viết để tìm hiểu thêm về việc triển khai trang lỗi tùy chỉnh. Đầu tiên hãy đi đến config/application.rb và viết điều này vào cuối tệp
# To allow Inertia.js handle backend exceptions, we need to register an
# exceptions_app to show the exceptions via the `Error` Vue component.
# This app needs to be a middleware. To keep things simple we define an
# anonymous controller with a `show` method. This allows us to use
# `render inertia: ...`
#
# The exception app will be used if `consider_all_requests_local` is set to false,
# which is by default in production only
#
# More details about exceptions_app:
# https://guides.rubyonrails.org/configuring.html#rails-general-configuration
# https://github.com/rails/rails/blob/6-0-stable/actionpack/lib/action_dispatch/middleware/public_exceptions.rb
#
config.exceptions_app = ->(env) do
  Class.new(ActionController::Base) do # rubocop:disable Rails/ApplicationController
    layout "application"

    def show
      # Get the status code from the path, which is /500 or /404 etc.
      status = request.path_info.delete_prefix("/").to_i

      render inertia: "error",
        props: {status: status}, # Make the status code available to the Vue component
        status: status             # Return the same status code in the request header
    end
  end.action(:show).call(env)
end
Sau đó, chúng ta sẽ tạo một trang lỗi mới bên trong Pages (không có thư mục con) và ở đó chúng ta sẽ xác định thành phần và bố cục của nó
# error.vue
<script setup>
import { computed } from "vue";
import Layout from "../Layouts/minimal.vue";

defineOptions({ layout: Layout });
const props = defineProps(["status"]);

const title = computed(() => {
  return {
    403: "403",
    404: "404",
    500: "500",
    503: "503",
  }[props.status];
});
const description = computed(() => {
  return {
    403: "Unauthorized",
    404: "Not found",
    500: "Serever Error",
    503: "Maintenance",
  }[props.status];
});
</script>

<template>
  <v-row
    align="center"
    justify="center"
    style="height: 100vh"
    class="linear-gradient"
  >
    <v-col sm="12" md="4">
      <div class="text-h1 mx-auto text-center">{{ title }}</div>
      <div class="text-center py-8">{{ description }}</div>
      <div class="text-center">
        <iLink href="/" class="inertia-link" as="v-btn">
          <v-btn variant="text" color="primary">
            Ir al inicio
          </v-btn>
        </iLink>
      </div>
    </v-col>
  </v-row>
</template>

<style lang="scss" scoped>
.linear-gradient {
  background: linear-gradient(#cfd8dc, #fafafa);
}
</style>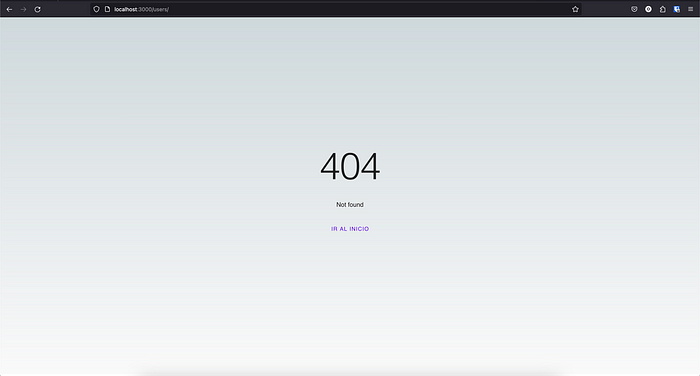
5. Lấy màu sắc
Hiện tại, giao diện xem chi phí không bao gồm màu sắc của danh mục, hãy sửa điều đó và chúng ta cũng muốn thay đổi ứng dụng sang chế độ tối vì chúng ta là xu hướng, hãy bắt đầu với phần back-end bằng cách xem bài viết này .
Chúng ta sẽ tạo ra một số serializers (không cần thiết), trước tiên chúng ta sẽ thêm 2 gem vào Gemfile của chúng ta, sau đó chúng ta sẽ tạo một tệp mới dưới config/initializers gọi là oj.rb, dưới app tạo một thư mục gọi là serializers và trong đó tạo base_serializer.rb và expense_serializer.rb và cuối cùng là một thay đổi nhỏ cho controller và view.
# Gemfile
# A fast JSON parser and serializer. (http://www.ohler.com/oj)
gem "oj"

# Faster JSON serialization for Ruby on Rails. Easily migrate away from Active Model Serializers (https://github.com/ElMassimo/oj_serializers)
gem "oj_serializers"
# config/initializers/oj.rb
require 'active_support/core_ext'
require 'active_support/json'
require 'oj'
Oj.optimize_rails
# app/serializers/base_serializer.rb
OjSerializers::Serializer::ALLOWED_INSTANCE_VARIABLES |= ['scope']
# Internal: Provides simple integration with cancancan.
class BaseSerializer < Oj::Serializer
private
# Backwards Compatibility: Allows to access the controller in the same way
# than ActiveModel::Serializers.
def scope
@scope ||= RequestLocals[:current_controller]
end
end# app/serializers/expense_serializer.rb
class ExpenseSerializer < BaseSerializer
attributes(:id, :name, :amount)
attribute :category_color do
expense.category.color
end
endr# expenses_controller.rb
def index
@expenses = ExpenseSerializer.many(Expense.includes(:category))
render inertia: "expenses/index", props: {
expenses: @expenses
}
end# app/frontend/Pages/expenses/index.vue
<template>
<div v-for="expense in expenses" :key="expense.id" class="pa-4">
<v-card :color="expense.category_color">
<template v-slot:title>
{{ expense.name }}
</template>
<template v-slot:subtitle>
{{ expense.amount }}
</template>
</v-card>
</div>
</template>
<script setup>
defineProps(["expenses"]);
</script>
Đối với chế độ tối, chúng ta sẽ thực hiện một số thay đổi thực sự đơn giản trong app/frontend/vuetify.js, và một số thay đổi trong các kiểu dáng, nếu bạn muốn tùy chỉnh nhiều hơn về kiểu dáng, hãy xem đây.
// vuetify.js
import 'vuetify/styles'
import '@mdi/font/css/materialdesignicons.css'
import { createVuetify } from 'vuetify'

export const vuetifyPlugin = createVuetify({
  ssr: true,
  theme: {
    defaultTheme: 'dark'
  }
})

// Layouts/default.vue
<style lang="scss" scoped>
.inertia-link {
  color: #F5F5F5;
  text-decoration-line: none;
}
</style>

// Pages/error.vue
<style lang="scss" scoped>
.linear-gradient {
  background: linear-gradient(#78909C, #424242);
}
</style>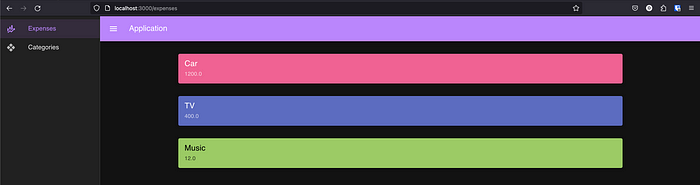

6. Tích hợp Devise
Cuối cùng, nếu chúng ta muốn gia đình và bạn bè của chúng ta sử dụng ứng dụng mới của chúng ta, chúng ta muốn thêm người dùng và bảo vệ nó khỏi những người dùng khác nhìn vào các chi phí của chúng ta, điều này sẽ được thực hiện với devise, trước tiên chúng ta muốn cài đặt devise và cấu hình nó để nói chuyện với phía front-end
# Gemfile
# Allows to register per-request thread-safe variables (https://github.com/ElMassimo/request_store_rails)
gem "request_store_rails" # not needed, but you need to remove "RequestLocals" references
# Devise is a flexible authentication solution for Rails based on Warden. [https://github.com/heartcombo/devise]
gem "devise"

# Terminal
rails generate devise:install
rails generate devise User
rails db:migrate

# rails console
User.create(email: "user@email.com", password: "password")
Sau đó, chúng ta sẽ tạo một migration để thêm tham chiếu người dùng và chạy các migration của chúng ta
# terminal
rails g migration addUserReferencesToExpensesAndCategories user:references

# migration
class AddUserReferencesToExpensesAndCategories < ActiveRecord::Migration[7.0]
  def change
    add_reference :expenses, :user, foreign_key: true
    add_reference :categories, :user, foreign_key: true
  end
end

# terminal
rails db:migrate
Chúng ta sẽ thêm một số routes vào routes.rb của chúng ta để chúng ta có thể cho devise biết phải hiển thị cái gì
Rails.application.routes.draw do
  defaults export: true do
    devise_for :users, skip: [:sessions, :passwords, :registrations]

    as :user do
      get "login", to: "users/sessions#new", as: :new_user_session
      post "login", to: "users/sessions#create", as: :user_session
      match "logout", to: "users/sessions#destroy", as: :destroy_user_session, via: Devise.mappings[:user].sign_out_via
    end

    resources :expenses
    resources :categories
  end

  root to: "expenses#index"
end
Chúng ta sẽ tạo một thư mục controllers/users và sessions_controller.rb
# app/controllers/users/sessions_controller.rb
class Users::SessionsController < Devise::SessionsController
  # GET /resource/sign_in
  def new
    render inertia: "users/login"
  end

  # POST /resource/sign_in
  def create
    super
  end

  # DELETE /resource/sign_out
  def destroy
    super
  end
end
Và chúng ta đang tạo một Pages/users/login.vue
<template>
  <v-row align="center" justify="center" style="height: 100vh" >
    <v-col sm="12" md="4">
      <div class="text-h2 text-center pb-8">Expenses Tracker</div>
      <form @submit.prevent="submit">
        <v-text-field name="email" label="email" v-model="values.email" autocomplete="email"></v-text-field>

        <v-text-field name="password" label="password" v-model="values.password" autocomplete="current-password"
          :type="show ? 'text' : 'password'" :append-inner-icon="show ? 'mdi-eye-off' : 'mdi-eye'"
          @click:append-inner="show = !show"></v-text-field>

        <div class="text-center py-4">
          <v-btn block size="large" class="me-4" type="submit" color="primary">
            Conectar
          </v-btn>
        </div>
      </form>
      <v-row justify="space-between" class="pb-6 pt-2">
        <iLink href="#" class="inertia-link text-body-2" as="a">
          Crear cuenta
        </iLink>
        <iLink href="#" class="inertia-link text-body-2" as="a">
          Olvide mi contraseña
        </iLink>
      </v-row>
    </v-col>
  </v-row>
</template>

<script setup>
import { ref } from "vue"
import Layout from "../../Layouts/minimal.vue";
import { useForm } from "@inertiajs/vue3";
import { usersSessions as sessionsApi } from "../../api";

defineOptions({ layout: Layout });

const show = ref(false);
const values = ref(
  {
    email: "",
    password: ""
  }
);

const submit = async () => {
  const form = useForm({
    user: { ...values.value },
  });

  form.post(sessionsApi.create.path())
};
</script>

<style lang="scss" scoped>
.inertia-link {
  color: #F5F5F5;
  text-decoration-line: none;
}
</style>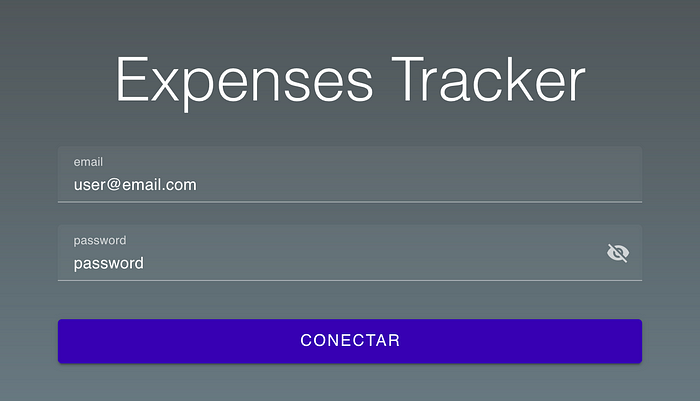
Bây giờ để kết nối phía front-end của chúng ta với phía back-end, chúng ta cần thực hiện một số bước bổ sung, bắt đầu bằng cách cấu hình token phiên, trong mã có một số liên kết hữu ích để tìm hiểu thêm về thay đổi này, và chúng ta sẽ tạo 2 mối quan tâm cho bước này
# controllers/concerns/inertia_csrf.rb
require "active_support/concern"

# Store the CSRF token in a non-session cookie so Axios can access it
# Name it as XSRF-TOKEN, because this is the Axios default
#
# More info: https://pragmaticstudio.com/tutorials/rails-session-cookies-for-api-authentication
#
module InertiaCsrf
  extend ActiveSupport::Concern

  included do
    before_action :set_csrf_cookie

    rescue_from ActionController::InvalidAuthenticityToken do
      redirect_back fallback_location: "/", notice: "The page expired, please try again."
    end
  end

  # Rails uses HTTP_X_CSRF_TOKEN, but axios sends HTTP_X_XSRF_TOKEN (different name, X instead of C)
  # By overriding `request_authenticity_tokens` we can tell Rails to check HTTP_X_XSRF_TOKEN, too
  # Source: https://github.com/rails/rails/blob/v6.0.3.2/actionpack/lib/action_controller/metal/request_forgery_protection.rb#L305-L308
  def request_authenticity_tokens
    super << request.headers["HTTP_X_XSRF_TOKEN"]
  end

  private

  def set_csrf_cookie
    cookies["XSRF-TOKEN"] = {
      value: form_authenticity_token,
      same_site: "Strict"
    }
  end
end
# controllers/concerns/auth.rb
require "active_support/concern"
module Auth
extend ActiveSupport::Concern
included do
before_action :authenticate_user!
rescue_from CanCan::AccessDenied do
render inertia: "error", props: {
status: 403
}
end
end
private
def after_sign_in_path_for(resource)
stored_location_for(resource) || root_path
end
def after_sign_out_path_for(_resource_or_scope)
new_user_session_path
end
endVà chúng ta sẽ bao gồm mối quan tâm này vào bên trong application_controller của chúng ta
class ApplicationController < ActionController::Base
  include Auth
  include InertiaCsrf

  # Used in BaseSerializer.
  before_action { RequestLocals[:current_controller] = self }

  # send the user email to the frontend
  inertia_share auth: -> {
    {
      user: current_user.as_json(only: [:email])
  }
end
Và trước khi chúng ta chạy máy chủ của mình, chúng ta tạo js_from_routes của chúng ta với
rails js_from_routes:generateBây giờ bạn có thể đăng nhập vào trang web, hãy tạo một nút ngắt kết nối trong thanh app-bar
# Layoutes/default.vue
# At the end of the app-bar
...
<iLink :href="sessionsApi.destroy.path()" method="delete" class="inertia-link" as="v-btn">
    <v-btn v-if="$page.props.auth?.user">logout</v-btn>
  </iLink>
</v-app-bar>

# inside the script
import { usersSessions as sessionsApi } from "../api";
Và đó là cách bạn có thể đăng nhập/đăng xuất.
Để ngăn chặn người dùng khác truy cập vào dữ liệu không phải của riêng họ, chúng tôi sử dụng cancancan (chỉ để đưa ra một ví dụ)
# Gemfile
# CanCanCan is an authorization library for Ruby and Ruby on Rails. [https://github.com/CanCanCommunity/cancancan]
gem "cancancan"

# terminal
bundle install
rails g cancan:ability
Sau đó, chúng ta sẽ thêm các quy tắc đơn giản trong tệp ability mới của chúng ta
# app/models/abillity.rb
# frozen_string_literal: true

class Ability
  include CanCan::Ability

  def initialize(user)
    return unless user.present?

    can :read, :all, user: user

    # this can be helpfull in case we have user tiers or roles
    # return unless user.premium?
    # can :manage, :all, user: user
  end
end
Sau đó, trong mỗi controller, chúng ta cần thêm các helper của chúng ta, tôi cũng đã gặp một lỗi trong model nên tôi đã sửa nó
# expenses and categories controllers at the top of the file
# bellow the before_action
load_and_authorize_resource

# In the index method replace the Model.all for something like this
@model = Model.accessible_by(current_ability))

# In both models lets be sure that our relationship is well mapped
belongs_to :user, foreign_key: "user_id"
Đối với Quyền trong phần frontend, chúng ta có thể tuân theo tài liệu inertia và chúng ta có thể gửi một prop từ controller, có thể đọc từ view, trong ví dụ này tôi không sử dụng các prop đó nhưng đó chỉ là thông tin bổ sung 🙂
# controller
render inertia: "resource/index", props: {
  categories: @resources
  can: {
    read: can? :read, @resource,
    update: current_user.is_the_best?
  }
}

# vue component
<script setup>
defineProps(["resources", "can"]);
</script>

<template>
  <v-btn v-if="can.edit">Edit Resource</v-btn>
</template>
Và đó là tất cả. Chúng ta đã covered nhiều chủ đề trong bài hướng dẫn/ví dụ này, hy vọng bạn thấy nó hữu ích và hãy nhớ rằng bạn có thể kiểm tra repo để xem nó trông như thế nào. Chúng ta có thể làm sạch mã hoặc thêm nhiều tính năng hơn (như các hoạt động CRUD bị thiếu) nhưng chúng ta đã học cách truy xuất và cách gửi dữ liệu, vì vậy bạn có thể tiếp tục học với ứng dụng này, có thể bạn có thể thêm Oauth hoặc một trang hồ sơ, đây là một nơi tốt để bắt đầu khám phá cách làm mới này của monolithic rails với vue, tôi có rất nhiều ý tưởng từ repo này, người này là một thiên tài và bạn nên kiểm tra một số công việc của anh ấy.
Trên cả bề dày kiến thức và sức mạnh của Vue.js và Rails, chúng ta đã khám phá và học hỏi nhiều điều thú vị. Vue on Rails không chỉ là việc kết hợp hai công nghệ, mà còn là sự kết nối giữa cộng đồng phát triển web và sự tiến bộ của ngành công nghiệp. Tại Cafedev, chúng tôi rất vui khi đã có cơ hội chia sẻ kiến thức và trải nghiệm về chủ đề này. Hãy tiếp tục đồng hành cùng chúng tôi trên con đường khám phá và phát triển với Vue on Rails.
Các nguồn kiến thức MIỄN PHÍ VÔ GIÁ từ cafedev tại đây
Nếu bạn thấy hay và hữu ích, bạn có thể tham gia các kênh sau của CafeDev để nhận được nhiều hơn nữa:
Chào thân ái và quyết thắng!


 trong C++")

