Chào mừng đến với Cafedev! Trong bài viết này, chúng ta sẽ cùng nhau khám phá cách xây dựng một ứng dụng to-do CRUD cơ bản sử dụng Vue 3, Node.js, Express, SQLite và Vite. Đây là một cơ hội tuyệt vời để thực hành kỹ năng lập trình và hiểu rõ hơn về cách làm việc với các công nghệ phổ biến trong việc phát triển ứng dụng web. Hãy bắt đầu hành trình lập trình của bạn cùng với chúng tôi tại Cafedev!
Hãy bắt đầu bằng cách tạo một ứng dụng To-Do đơn giản bằng Vue 3, Node.js, Express.js, SQLite, và Vite.
Hướng dẫn này sẽ giúp bạn xây dựng cả phần bạn nhìn thấy (frontend) và phần hoạt động phía sau màn hình (backend).
To-Do crud app sử dụng vue3 & nodeJS & expressJS server & SQLite & Vite | frontend & backend
Bạn sẽ học cách tạo, xem, cập nhật và xóa các nhiệm vụ, tạo ra một ứng dụng danh sách To-Do hoàn chỉnh.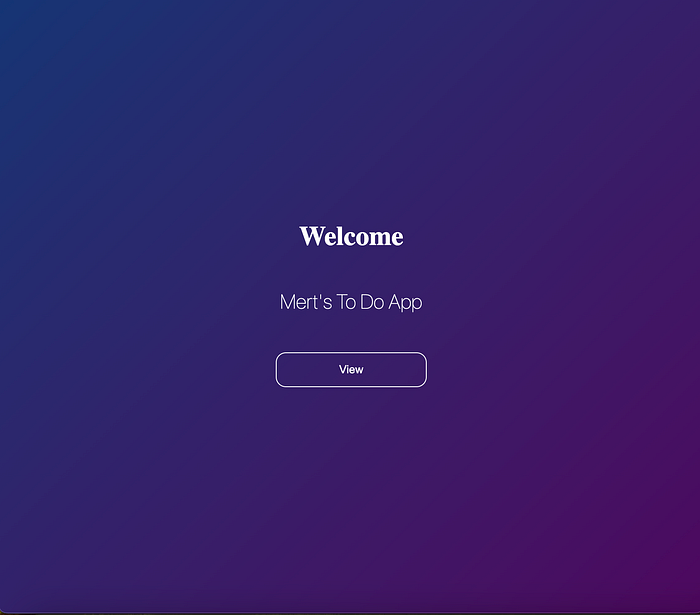

Nội dung chính
1. Công nghệ phía Frontend:
Thư viện Framework Web
* Vue3
Thư viện điều hướng
* Router
Server phát triển & Công cụ xây dựng
* Vite
2. Công nghệ phía Backend:
Môi trường chạy mã JavaScript phía máy chủ
* NodeJS
Khung ứng dụng Web để xây dựng các API NodeJS
* ExpressJS
3. Công nghệ Cơ sở dữ liệu:
Cơ sở dữ liệu nhẹ
* SQLite
Vì vậy bây giờ chúng ta hãy bắt đầu với các bước cấu hình dưới đây.
4. Cấu hình trước:
1. Tải xuống & Cài đặt NodeJS https://nodejs.org/en
2. Tải xuống & Cài đặt VueJS https://vuejs.org/
5. Tạo Dự Án
5.1. Tạo Thư Mục Dự Án
- Ví dụ: Tạo một thư mục có tên là “TODOLIST” trên desktop của bạn Cấu trúc thư mục sẽ như dưới đây.
TODOLIST (Thư Mục Dự Án)*
├── frontend│ ├── node_modules│ ├── public│ ├── src│ │ ├── assets│ │ ├── components│ │ │ ├── HeaderComponent.vue│ │ │ ├── TheWelcomeComponent.vue│ │ │ └── TodoComponent.vue│ │ ├── router│ │ │ └── index.js│ │ ├── views│ │ │ ├── TheWelcomeView.vue│ │ │ └── TodoView.vue│ │ ├── app.vue│ │ └── main.js│ ├── index.html│ ├── jsconfig.json│ ├── package-lock.json│ ├── package.json│ ├── README.md│ └── vite.config.js
├── backend│ ├── node_modules│ ├── database.sqlite│ ├── package.json│ ├── server.js│ └── test.http
6. Tạo Backend API
Hãy bắt đầu bằng cách tạo cấu trúc backend và một API để cung cấp dữ liệu cho ứng dụng này và làm cho ứng dụng này động.
TODOLIST (Thư Mục Dự Án)
├── backend│ ├── node_modules│ ├── database.sqlite│ ├── package.json│ ├── server.js│ └── test.http
6.1. Tạo Thư Mục Dự Án Backend API
- Tạo một thư mục có tên là ví dụ “backend” trong thư mục dự án TODOLIST.
6.2. Mở thư mục này trong VSCode
- Mở cửa sổ terminal mới trong VS Code từ thanh trên cùng với “Terminal” Bây giờ bạn nên ở trong thư mục “backend”. (kiểm tra nếu bạn không ở đó. Nếu không, hãy vào đó bằng lệnh cd desktop > *cd TODOLIST > cd backend ** )
6.3. Khởi tạo NodeJS
- Lệnh terminal: “ npm init ” lệnh (sau đó nhấn enter và bỏ qua tất cả)
6.4. Cài đặt Dependencies:
Cài đặt gói “ExpressJS”. ExpressJS
* Vẫn làm việc trong terminal của VSCode và đường dẫn của thư mục ứng dụng. Chạy lệnh này để cài đặt ExpressJS. “ npm install express — save “
Cài đặt gói “Sequelize”.
* Chạy lệnh này để cài đặt SequelizeJS. Lệnh Terminal: “ npm install sequelize — save ”
Cài đặt gói “Sqlite3”.
* Chạy lệnh này để cài đặt Sqlite3. Lệnh Terminal: “ npm install sqlite3 — save* ”
6.5. Tạo tệp “server.js” trong thư mục “TODOLIST”
Server.js — Thêm mã sau vào tệp.
* Hàm setupDB() được sử dụng để truy xuất dữ liệu và tạo dữ liệu trong DB
* Hàm startServer() được sử dụng để chạy API và kích hoạt các phương thức của nó. Điều này có nghĩa là thông qua các đường dẫn được khai báo trong hàm này, bạn có thể gửi các yêu cầu để truy xuất và tạo dữ liệu.
const { Sequelize, DataTypes } = require('sequelize');
const sequelize = new Sequelize ({
    dialect: 'sqlite',
    storage: './database.sqlite'
})
var db = {}


// THIS FUNCTION WILL CREATE DUMMY DATA IN DATABASE TABLE
async function setupDB() {
    try {
        db.Task = sequelize.define('Task', {
            text: {
                type: DataTypes.STRING,
                allowNull: false
            },
        });
        await sequelize.sync({ force: true });
        await db.Task.create({ text: "Item-1-MertKadirGursoy"});
        await db.Task.create({ text: "Item-2"});
        await db.Task.create({ text: "Item-3"});
    } catch (error) {
        console.error(error);
    }
}


// CREATE APIs URL ENDPOINTS TO CREATE AND DELETE TO DO ITEMS
async function startServer() {
    try {
        await setupDB()
        const port = 3001
        const express = require('express')
        const app = express()
        app.use(express.json())
        app.get('/', (req, res) => {
            res.send('hello world')
        })


        // GET METHOD API URL | RETRIEVE ITEMS
        app.get('/api/tasks', (req, res) => {
            // return all taskls
            db.Task.findAll().then(tasks => {
                res.json(tasks)
            })
        })
        // POST METHOD API URL | CREATE ITEM
        app.post('/api/tasks', (req, res) => {
            // create a task
            db.Task.create(req.body).then( t => {
                res.json(t)
            })
        })


        // DELETE METHOD API URL | DELETE ITEM
        app.delete('/api/tasks/:id', (req, res) => {
            // delete a task
            db.Task.destroy({
                where: {
                    id: req.params.id
                }
            }).then(() => {
                res.sendStatus(204);
            }).catch((error) => {
                console.error(error);
                res.sendStatus(500); // Internal Server Error
            });
        });


        app.listen(port, () => {
            console.log(`App listening on port ${port}`)
        })
    } catch (error) {
        console.error(error);
    }
}
startServer()
6.6. Chạy Máy Chủ (API)
- ví dụ: desktop > TODOLIST > backend Chạy Lệnh Terminal Này: “ node server* ”
6.7. Kiểm Tra API Này trong Trình Duyệt
- Mở URL này trong trình duyệt.
- “Localhost:3001”
- “Localhost:3001/api/tasks”
Thêm: Xem Yêu Cầu & Phản Hồi API trong VSCode
- Cài đặt Phần Mở Rộng Rest Client trong VSCode Tạo tệp “test.http”. Thêm URL API vào đó. “GET Localhost:3001/api/tasks”* Bạn có thể xem phản hồi của nó.
Thêm: Xem Bảng DB trong VSCode
- Cài đặt phần mở rộng “Sqlite Viewer” trong VSCode
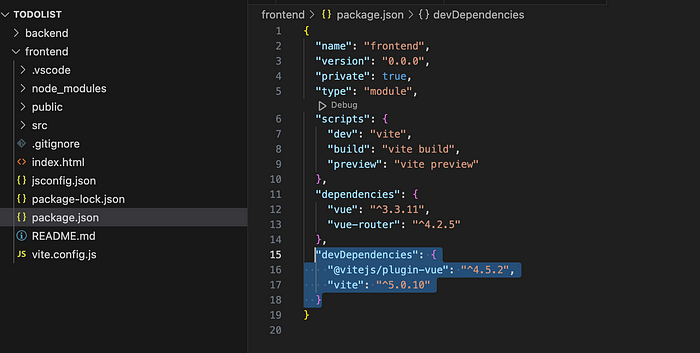
7. Tạo Frontend Vue 3
├── frontend│ ├── node_modules│ ├── public│ ├── src│ │ ├── assets│ │ ├── components│ │ │ ├── HeaderComponent.vue│ │ │ ├── TheWelcomeComponent.vue│ │ │ └── TodoComponent.vue│ │ ├── router│ │ │ └── index.js│ │ ├── views│ │ │ ├── TheWelcomeView.vue│ │ │ └── TodoView.vue│ │ ├── app.vue│ │ └── main.js│ ├── index.html│ ├── jsconfig.json│ ├── package-lock.json│ ├── package.json│ ├── README.md
│ └── vite.config.js
7.1. Tạo Thư Mục Frontend với Vue
- ví dụ: desktop > TODOLIST* Mở VS Code
- Mở thư mục dự án TODOLIST trong VSCODE
- Mở Terminal VSCode Mới
- Chạy lệnh này để tạo thư mục “ frontend ” trong thư mục dự án
- Lệnh Terminal: “ npm init vue@latest ”
- Nó sẽ hỏi bạn viết y và sau đó nhấn enter
- Nó sẽ hỏi tên dự án, viết “ frontend “ và sau đó nhấn enter
- Sau đó bỏ qua các thông tin khác
7.2. Đi vào thư mục frontend
- Lệnh Terminal: cd frontend
7.3. Cài đặt npm trong thư mục frontend cho dự án vue
- Lệnh Terminal: “ npm install “
7.4. Tạo các vue “ components “ cần thiết trước
- Đầu tiên, chúng ta cần tạo các thành phần sau để tạo các trang (views). Các thành phần này sẽ được sử dụng trong các tệp vue của các trang (pages)
│ │ ├── components*│ │ │ ├── HeaderComponent.vue<template>
<h1> The Mert's To Do App</h1>
</template>
<style>
h1 {
text-align: center;
margin-top: 45px;
margin-bottom: 45px;
color: white;
width: 100%;
}
</style>│ │ │ ├── TheWelcomeComponent.vue
<template>
  <div id='theContainer'>
    <h1> Welcome</h1>
    <h2>  Mert's To Do App  </h2>
    <router-link to="/todo-app">
      <button style="margin: 23px; width: 24%;">View</button>
    </router-link>
  </div>
</template>

<style>
body {
  background: linear-gradient(135deg, #153575, #4e085f);
}
#theContainer {
  text-align: center;
  margin: 23px;
  padding: 23px;
}
h1 {
    text-align: center;
    margin-top: 45px;
    margin-bottom: 45px;
    color: white;
    width: 100%;
}
h2 {
  text-align: center;
  margin-bottom: 24px;
  font-weight: lighter;
  font-family: system-ui;
  color: white;
}
button {
    width: 50%;
    border: 1px solid white !important;
    padding: 10px;
    background-color: transparent;
    color: white;
    border: none;
    padding: 12px;
    border-radius: 12px;
    cursor: pointer;
  }
</style>
│ │ │ └── TodoComponent.vue
<script setup>
import { onMounted, ref } from 'vue'

let id = 0
const newTodo = ref('')
const todos = ref([])

// Add Item via FETCH API
async function createTask(text) {
  try {
    const requestOptions = {
      method: 'POST',
      headers: { 'Content-Type': 'application/json' },
      body: JSON.stringify({ text: text })
    };
    const response = await fetch('/api/tasks', requestOptions)
    return await response.json();
  } catch (error) {
    console.error(error);
  }
}

// FETCH API üzerinden öğe silme
async function deleteTask(id) {
  try {
    const requestOptions = {
      method: "DELETE",
    };
    const response = await fetch(`/api/tasks/${id}`, requestOptions);

    if (response.ok) {
      // Eğer yanıt durumu OK (204) ise, yerel todos'u güncelle
      todos.value = todos.value.filter((t) => t.id !== id);
    } else {
      console.error("Görev silinirken hata oluştu:", response.statusText);
    }
  } catch (error) {
    console.error(error);
  }
}


async function addTodo() {
  const newTask = await createTask(newTodo.value)
  todos.value.push(newTask)
  newTodo.value = ''
}

async function removeTodo(todo) {
  await deleteTask(todo.id)
  todos.value = todos.value.filter((t) => t.id !== todo.id)
}

onMounted(async () => {
  await fetchTasks();
})

async function fetchTasks() {
  try {
    const response = await fetch('/api/tasks');
    todos.value = await response.json();
  } catch (error) {
    console.error(error);
  }
}
</script>

<template>
  <div id="containerr" style="text-align: center; display: inline-block; width: 49%;">
    <form @submit.prevent="addTodo">
      <input autofocus placeholder="add your texthere" id='inptBtn' v-model="newTodo">
      <button id="addBtn">Add Todo</button>
    </form>
    <ul>
      <li v-for="item in todos" :key="item.id">
        {{ item.text }}
        <button style='height: 39px; width: 39px; border-radius: 23px;' @click="removeTodo(item)">X</button>
      </li>
    </ul>
    <router-link to="/">
        <button style="width: 157px;">Back to Home</button>
    </router-link>
  </div>
</template>


<style scoped>

  /* Sayfayı ortala */
  body {
    display: flex;
    justify-content: center;
    align-items: center;
    height: 100vh;
    margin: 0;
  }

  /* Formu ortala ve oval çerçeve ekle */
  form {
    display: flex;
    padding-left: 12px;
    padding-right: 12px;
    margin-bottom: 23px;
    flex-direction: column;
    align-items: center;
    border: 2px solid #ccc;
    border-radius: 34px;
    padding-top: 34px;
    padding-bottom: 34px;
    background-color: transparent;
  }

  input {
    margin-bottom: 10px;
    padding: 10px;
    border-radius: 5px;
    color: black; /* Metin rengini siyah olarak ayarla */
  }


  #inptBtn {
    border-radius: 23px;
    height: 59px;
    margin-bottom: 5%;
    width: 89%;
    background: transparent;
    color: white;
  }


  #addBtn {
    width: 50%;
    border: 1px solid white !important;
  }


  button {
    padding: 10px;
    background-color: transparent;
    color: white;
    border: none;
    padding: 12px;
    border-radius: 12px;
    cursor: pointer;
  }

  button:hover {
    background-color: #aaaaaa23;
  }

  ul {
    list-style-type: none;
    padding: 0;
  }

  li {
    display: flex;
    justify-content: space-between;
    align-items: center;
    margin-bottom: 10px;
    padding: 10px;
    border: 1px solid #ffffff4a;
    border-radius: 23px;
    background-color: #fff;
    color: rgb(255, 255, 255); /* Metin rengini siyah olarak ayarla */
    background-color: transparent;
  }
</style>
7.5. Tạo các vue “ views “ cần thiết
- Các thành phần đã được tạo ở trên sẽ được sử dụng trong các tệp vue views này.
│ │ ├── views│ │ │ ├── TheWelcomeView.vue
<script setup>
// Önce TheWelcomeComponent TODOLIST > frontend > src > components klasöründen çekilir.
// Sonra aşağıda <TheWelcomeComponent /> olarak <template> içinde kullanılır.
import TheWelcomeComponent from '../components/TheWelcomeComponent.vue'
</script>
<template>
  <main>
    <TheWelcomeComponent />
  </main>
</template>
│ │ │ └── TodoView.vue
<script setup>
// Önce TodoComponent TODOLIST > frontend > src > components klasöründen çekilir.
// Sonra aşağıda <TodoComponent /> olarak <template> içinde kullanılır.
import TodoComponent from '../components/TodoComponent.vue'
</script>

<template>
  <main>
    <TodoComponent />
  </main>
</template>
7. 6. Tạo cấu trúc vue “ router & tệp index.js cần thiết“
- Chạy lệnh này để cài đặt các phụ thuộc router trong thư mục frontend. TODOLIST > frontend | “ npm install vue-router “
- Tạo thư mục “ router “ trong TODOLIST > frontend > src **
├── frontend│ ├── node_modules│ ├── public│ ├── src│ │ ├── assets│ │ ├── components
│ │ ├── router** - Tạo index.js trong thư mục router
├── frontend│ ├── node_modules│ ├── public│ ├── src│ │ ├── assets│ │ ├── components
│ │ ├── router
│ │ │ └── index.js// src/router/index.js
import { createRouter, createWebHistory } from 'vue-router'
import TheWelcomeView from '@/views/TheWelcomeView.vue'
import TodoView from '@/views/TodoView.vue'
const routes = [
{ path: '/', component: TheWelcomeView },
{ path: '/todo-app', component: TodoView }
]
const router = createRouter({
history: createWebHistory(),
routes
})
export default routerp>
// Önce TodoComponent TODO
7. 7. Tạo tệp vue “ app.vue cần thiết“ để hiển thị views (pages) qua cấu trúc router trong trình duyệt.
├── frontend│ ├── node_modules│ ├── public│ ├── src│ │ ├── assets│ │ ├── components│ │ ├── router│ │ │ └── index.js│ │ ├── views
│ │ ├── app.vue│ │ └── main.js
<!-- src/App.vue -->
<script setup>
// <router-view></router-view> ile yukarıda router'da kurulan yapı
import HeaderComponent from './components/HeaderComponent.vue'
</script>

<template>
  <div id="app">
    <router-view></router-view>
  </div>
</template>


<style>
#app {
  display: block;
  width: 100%;
  margin: 0 auto;
  margin-bottom: 23px;
  padding: 0rem;
  font-weight: normal;
  text-align: center;
}

header {
  text-align: center;
  color: white;
}

body {
  background: linear-gradient(135deg, var(--colorPrimary), #4e085f);
  display: flex;
  justify-content: center;
  align-items: center;
  height: 100vh;
  margin: 0;
}
</style>
7.8. Tạo tệp vue “ main.js cần thiết“ để tạo và xây dựng ứng dụng vue.
├── frontend│ ├── node_modules│ ├── public│ ├── src│ │ ├── assets│ │ ├── components│ │ ├── router│ │ │ └── index.js│ │ ├── views│ │ ├── app.vue
│ │ └── main.js
// src/main.js
import { createApp } from 'vue'
import App from './App.vue'
import router from './router'

createApp(App).use(router).mount('#app')
7.9. Cài đặt Vite Dev Server & Chạy
- Lệnh Terminal: “ npm run dev “ Lưu ý:* Để trong thư mục frontend nó sẽ tự động tạo packages.json phụ thuộc.
7.10. Kiểm tra trong trình duyệt “ http://localhost:5173/ ”
1. Trước tiên, xây dựng backend API.— Điều hướng đến thư mục “TODOLIST > backend” trong terminal của bạn.— Chạy lệnh: “ node server ”
2. Tiếp theo, xây dựng frontend bằng cách sử dụng Vite.— Điều hướng đến thư mục “TODOLIST > frontend” trong terminal của bạn.— Chạy lệnh: “ npm run dev ”
Tóm lại, qua bài viết này trên Cafedev, chúng ta đã học cách xây dựng một ứng dụng to-do CRUD đơn giản bằng cách sử dụng Vue 3, Node.js, Express, SQLite và Vite. Qua việc áp dụng các kiến thức và kỹ năng đã học, bạn có thể tự tin bước vào thế giới phát triển ứng dụng web và thực hiện các dự án của riêng mình. Hãy tiếp tục theo dõi Cafedev để cập nhật thêm nhiều thông tin hữu ích và các hướng dẫn lập trình khác nhé!
Các nguồn kiến thức MIỄN PHÍ VÔ GIÁ từ cafedev tại đây
Nếu bạn thấy hay và hữu ích, bạn có thể tham gia các kênh sau của CafeDev để nhận được nhiều hơn nữa:
Chào thân ái và quyết thắng!


 trong C++")

